|
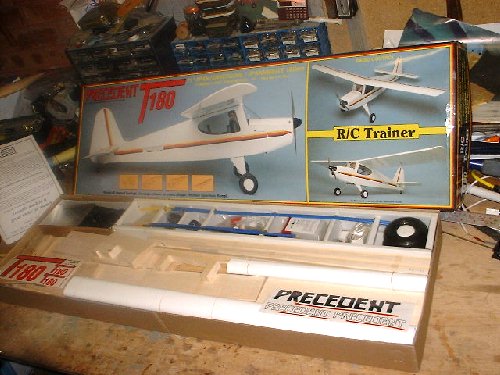
The T180 is a non-scale training and utility model of pleasant, high-wing cabin design, with tailwheel undercarriage. The structure is basically traditional, with balsa built-up wings and tail, while the fuselage is assembled from a slot-together arrangement of liteply panels.
The whole model is fabric or film covered. It requires either a .40 2-stroke or .60 4-stroke engine and 4-channel radio. The wingspan is 71 inches and the weight should be between 5 and 7 lb.
A veneered foam wing version is also available.
The printed (not dyeline) plans supplied show the full-size wing and tail structure in detail, while the slot-together design of the fuselage requires no full-size plan, the instructions and a sequence of photographs and diagrams being sufficient. A very comprehensive instruction book and parts list are included.
The quality of materials supplied is first class, with superb die-cutting of the components. A very complete pack of top-quality accessories is included, leaving the purchaser to find only the engine, radio, adhesive and covering materials.
I would say that the contents of this kit compare favourably with the best I have seen anywhere.
Assembly
All the balsa and ply sheet components are die-cut and press out of their panels cleanly and with minimal need to use a knife to separate them. A light sanding prepares the parts for assembly. Sufficient balsa strip wood is supplied, taped together in separate bundles according to use.
Small wooden parts are pre-cut and bagged together. The balsa sheet, strip and bagged parts are all stamped with numbers to ensure that each piece may be correctly identified while the die-cut panels have no part numbers on them but may be located from an illustration of each panel printed in the parts list booklet.
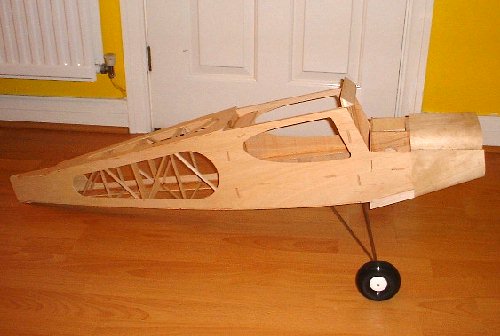
The fuselage is built from liteply panels which all slot together to form a strong, rectangular-section box. The use of pre-shaped top and bottom panels prevents the common error of building-in unequal curvature in the rear fuselage. A slot-together sub-structure within the forward fuselage provides an engine mounting with built-in sidethrust and space for the fuel tank.
All the pre-cut parts were found to fit together accurately without the need to adjust the shapes at all, except for sanding down protruding tongues flush with the fuselage sides. A little wood filler is needed to tidy up the tongue slots. Some components which need to be made from 6mm ply are supplied as a pair of die-cut 3mm ply pieces, which have to be laminated together before being used.
The side, top and bottom panels have huge holes cut in them to reduce the weight, so the finished structure needs to be covered in either fabric or film.
Die-cut clear plastic sheet is provided for the cabin windows.
The engine is radially mounted on a well-supported 6mm birch ply plate with the cylinder set at 45 degrees downward to allow the exhaust to exit via a cutaway tunnel in the lower fuselage. The engine mounting is designed to automatically build in the recommended down and side thrust, and the plans
show how far to offset the engine mount from the centre of the firewall to ensure that the prop driver is correctly centred in the cowling.
A .40-size glass-filled nylon radial mount and 8oz. rectangular plastic fuel tank are supplied. If you wish to fit a larger engine, the firewall may be placed further back to offset the longer crankcase, while there is plenty of space to fit a higher-capacity tank.
The cowling is made up from 0.8mm birch plywood sheet and block balsa on a rigid liteply frame, with large air inlet and outlet areas to keep the engine cool. I recommend coating the inside of the cowling liberally with epoxy laminating resin as a barrier against fuel rot and lightweight glasscloth and epoxy for the external finish. A glassfibre moulded cowling is available from the manufacturer as a spare part.
There is plenty of space to completely enclose the engine in the cowling and a remote connection to the glowplug is recommended.
The main undercarriage is soldered up from four pre-bent pieces of piano wire with the aid of a supplied liteply assembly jig and is attached to the fuselage by the supplied nylon saddle clamps and bolts with blind nuts. Triangular liteply pieces fill in between the front and rear legs, with a covering of lightweight glasscloth and epoxy resin. A good-quality set of lightweight wheels is included. The tailwheel is mounted in a nylon bracket and connects to the rudder for steering.
The wings are made in two panels over the plan, after which they are joined by substantial full-depth ply dihedral braces. Assembly is straightforward with flat-bottomed balsa ribs, upper and lower balsa spars with balsa sheet webs, sheet trailing edges and strip leading edge.
The front third of the wing is covered in balsa sheet on both surfaces, the whole then being fabric covered. The inset ailerons are skinned with sheet balsa and are built up as separate units.
The wings are attached to the fuselage in the conventional manner with leading-edge dowels and the supplied nylon wing bolts with blind nuts fitted into a well-secured ply plate.
The tailplane, fin and rudder are built-up, fabric-covered structures while the elevators are cut from sheet balsa. The tail assembly is permanently glued to the rear fuselage after covering.
The instructions specify covering the model in heat-shrink plastic film, but I believe that if the model is to be used for training, then nothing can beat the added strength of doped nylon covering on the entire model.
There is plenty of room for the radio installation in the huge cabin, a servo-mounting tray being built in as part of the fuselage structure. A liteply panel is provided to cover over the receiver and battery and there is a self-adhesive printed instrument panel and even a vacuum-formed ABS plastic pilot
provided to fill the space visible through the large cockpit windows.
The rudder, elevators and throttle are all driven by the supplied nylon snake tubes while the ailerons are driven from one servo, centrally-mounted in the wing, via snake tubes and bellcranks.
Flying the model
This model is designed to be very stable and should practically fly itself. We haven't got this far yet as the model is currently under construction.
I would expect the thick flat-bottomed wing to give plenty of lift, a safe and gentle stall and an excellent glide, while the undercarriage appears to be capable of absorbing the kind of landing you get in training.
Structural assessment
The liteply fuselage is different from normal practice and at first sight appears to possess excellent strength while being a little heavier than a more conventional structure. Unfortunately, as you begin to put the fuselage together you become aware of a potential
area of weakness in the rear fuselage. The die-cut plywood sheet sides, along with the top and bottom panels, each have very large cutouts in the centres, presumably to reduce weight, which means that the only things connecting the forward fuselage to the tail are
four longeron-like L-section strips of 3mm liteply, supported halfway along their length by a liteply bulkhead. This might not be so bad if the shape followed the grain in the plywood, but the fuselage taper in both side and plan views cuts diagonally across both the vertical and horizontal grain in each panel, seriously reducing the available strength. The thin 3x6mm soft balsa strips
glued inside the edges of the rear fuselage contribute no effective strength. I replaced the lower pair of balsa strips with 6mm square spruce, fitted from the front of the cabin all the way to the sternpost, to give a measure of structural continuity to the fuselage.
Additionally, the huge holes cut in the ply panels leave the rear fuselage very flexible by comparison to the absolutely rigid box forward of the wing trailing edge. Had the holes in the fuselage sides not been die-cut, I would have chosen to leave the sides solid, thus resolving all strength and flexibility weaknesses. While some flexibility may be desirable,
I believe that a heavy landing, such as is all too common when learning to fly, would be likely to transmit a shock into the rear fuselage which would
cause this area to twist sufficiently to shear the short-grained plywood. For this reason I added 5mm square hard balsa strips across the open areas, glued to the inner face, adding two pairs of uprights/crosspieces then a diagonal zig-zag pattern between them, to provide additional torsional stiffness.
The wings and tail are very much standard in design and use of materials for this type of model and are adequate for the task, although, with training in mind, I will be replacing the rather soft balsa wing spars with spruce. A lot of extra strength for a little extra weight.
The tail structure is conventional and strong enough for it's task, with sufficient surface area to ensure stability. I am not sure why the tailplane has been designed with a flat-bottomed lifting section, as the function of a tailplane in level flight is to provide a downward force, counterbalancing the nose-down tendency created by having the centre of gravity ahead of the wing's centre of lift. I was tempted to fit it inverted...
Final verdict
This is a reasonably quick to build model (the foam-wing option would be even quicker but probably more vulnerable as a trainer) and is a pleasure to build, thanks to the excellent quality of the parts, completeness of the accessory pack and clarity of plans and instructions. As it comes, not quite strong enough for the rigours of training
but fine as a utility model for everyday flying and easily strengthened where necessary. This model could be used for glider towing or for carrying loads such as cameras, although in each case a bigger engine than usual would probably be required. The design lends itself easily to simple modifications, such as the fitting of wing flaps.
This review will be added to as construction proceeds.
Postscript:
Every so often I get an email from somebody desperately seeking a set of T180 plans. It appears there are a lot of old part-built kits out there whose owners have lost the drawings. I wish I knew who currently owns the design as there is surely a ready market for the plans and maybe kit cutting.
|
|
Other people's comments on the T180 kit:
From Peter Smith in Australia:
I agree with your assessment of the rear fuz section. I have had three of the Precedent kits, Hi Boy, Hi Boy Turbo and the Low boy.
All employ the same construction of the rear section and as you theorised they do indeed snap off in a heavy landing!!
On to the topic of the ply. I have found it to be far inferior to the grade I have found in other kits, Topflite, Sig etc. I notice Flair use the same stuff as I found in their Astro Hog kit.
This ply may be lite but is absolute rubbish. It warps with the slightest humidity in the air and tends to be very fragile. I do wish that UK kit makers would use a high quality ply... I would gladly play more for the kit if they did!
Oh yeah, you will find that your "high quality wheels" will tend to split along the rim very soon . . .
From Dave Chadburn:
I bought and built one of the last T180's available. Unfortunately these kits are no longer available. I was unable to get hold of a foam wing so I had one made up by a local firm using the specification for the built up type.
This foam wing has taken about 12 ozs off the finished model so it does help with the power/weight ratio. I would agree with the lack of strength to the rear fuselage area and to overcome this I used the standard build materials
but covered these in isopon resin. This does stiffen things up quite considerably. Painting this resin inside the fuselage does add weight but the strength gained is worth it.
To date I have only flown the model a couple of times with a Thunder Tiger GP 42 providing the grunt. I am reasonably pleased with the flight characteristics of the model, but beware of the glide (dead stick), the model just doesn't want to land.
The ailerons need to be set for maximum travel to achieve a decent rate of roll. The rudder is more than adequate for turning the aircraft with a touch of up elevator.
From Peter Otto in Belgium:
The Precedent T180 was the first plane I ever built (and flew; actually I'm still a trainee).The verdict in my club was that it was probably the neatest plane in the club. Concerning the structure: I dind't add reinforcements to the back of the fuselage and, even after a few heavy landings, the plane (and the wheels) are still in one piece. I encountered just one problem until now: the bellcranks of the linkage of the ailerons started to wear out after less then 10 flights. I solved that by installing a micro servo in each wing. Dave's remark concerning dead stick landings is true: the plane just doesn't want to land, but concerning the ailerons I have to disagree; after modifying the controls, I had to trim back the aileron servos because the plane rolled too easily.
From John Claughton:
I would agree with the comments regarding the rear fuz area, however, what concerned me most was the tailplane section which tends to fall off under heavy landings. One solution I came up with is to put in locating dowels secured throught the liteply plate below the tail plane. I have restored two almost totalled T180s and am just starting the third which I obtained from a disgruntled mate in our flying club. The other weak point appears to be the front fuz just in front of the cockpit vertical where the middle pan goes into the engine bay. On angled/vertical impact the whole front snaps off - still, once repaired with some liteply they scrub up pretty well. I agree the plane is an absolute honey to fly, takeoffs can be a little hairy requiring quite a lot of right rudder - GP42 power - and once airborne, a little nursing to gain height is required. This aircraft is a total gem. Once properly trimmed, I get half an hour flying out of a 6 oz (the red topped tank) and fly high. When the engine cuts, it takes an age to return to earth. Good fun.
The T180 I am currently rebuilding was powered by a SC 46, which gave it a little more authority on take-off, but I think it will take my Irvine 46 mounted with the cylinder head horizontal. I managed to obtain a T240 but that will be built next year. T180`s are probably one of the best model aircraft flying - pity they're not made any more.
From Andy Miceli in Belgium:
I must say I had a great time building the model. In fact, I never experienced such joy (without problems or misunderstandings along the way) with all other planes.
I also experienced problems with the Stab section, but solved this with polyurethane glue and some securing pins. I also noticed a lot of play on the ailerons as it came of several linkages along the way. I simply never built it as was designed, I used a single servo in each wing. I still fly this plane today just because I love the flight characteristics.
|