|
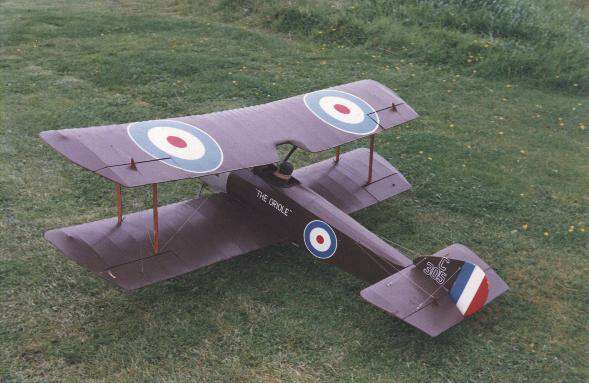
The DB Models Sopwith Pup is a quarter-scale biplane of traditional fabric-covered wooden structure.
The wingspan is 80 inches and it requires a 15cc 2-stroke or 20cc 4-stroke engine and four-function radio.
The weight should be between 12 and 20lb.
The plans as supplied are comprehensively detailed, with more than adequate instructions. A second set of
outlines are drawn dotted over the main drawing to allow the model to be completed as the 2-seat Sopwith Dove,
with swept-back wings and alternative tailplane and fin.
The quality of the materials supplied is excellent and the standard of cutting of the bandsawn ribs and formers is good. The glassfibre cowling is good quality.
Structure
The fuselage is built as a traditional box framework, from 1/4in square balsa. Select the hardest balsa possible for the longerons
as they are susceptible to handling damage.
The sides are held together by a set of pre-cut plywood formers at the front, to which the centre-section struts are bound and glued. Balsa cross-pieces link the sides further back
Curved sub-formers and balsa stringers complete the outer shape of the fuselage, with thin ply skinning of the nose panels. A glassfibre engine cowl completes the nose,
although some may wish to replace this with one of the metal cowlings available.
The wings are easy to build, with thick flat-bottomed ribs. Each wing is built in three panels which are then permanently joined.
Simply pin down the lower spars, leading and trailing edges to the plan,
glue the ribs on top then glue the upper spars into their slots. Balsa sheet wingtips complete the outline. The four ailerons
are built in a similar manner and attached after covering.
The upper centre section has mountings for the struts, consisting of brass tube at the rear and bolted saddle clamps at the front.
The centre section struts have a piece of piano wire linking the front strut to the rear just below the wing, overhanging both struts. The back of this wire slides into the brass
tube while the front is retained by the saddle clamp. This method of attaching the top wing is simple, effective and secure.
The lower centre section has dowels and nylon wing bolts for attachment and holds the rear undercarriage leg mounting plate. The centre section under surface is ply skinned.
The tailplane and elevators are built as a 1/4 inch thick flat frame onto which outer ribs are glued then shaped to section. The fin and rudder are flat with a
balsa sheet outline and balsa strip ribs. The whole tail assembly is permanently glued to the fuselage after covering.
The undercarriage is soldered up from pre-formed piano-wire legs with a hardwood cross beam. The piano-wire axle is attached to the centre of the cross beam
to provide some springing. Additional springing is provided by elastic bands across the axle inboard of each wheel. The wheels provided are strong spoked plastic hubs
with solid circular-section sponge rubber material to make the tyres. Wooden spokes are built up on the hubs after which they are fabric covered. The undercarriage is
attached by saddle clamps to the fuselage underside and lower wing centre section.
Doped nylon covering over the whole structure completes the model. More modern heat-shrink covering materials may be used instead.
There is plenty of space for the radio installation. The rudder and elevators are driven by closed-loop cables; the rudder horn being linked directly to the servo,
while the elevator cables are attached to a bellcrank in the fuselage, with a short pushrod to the servo. The aileron servo fits in the lower centre section, driving
the bottom ailerons via pushrods and bellcranks. The upper ailerons are connected to the lower ones by rigid wire rods.
The wings are rigged with steel cable. Although the wings appear to have sufficient strength, I would be reluctant to test their strength in the air without rigging wires.
Flying the model
This is quite simply one of the most stable scale models in existence. Provided the centre of gravity is in the right place it will fly itself.
Take-off is easy, with only a little rudder needed to stop it swinging and it climbs well. Simple aerobatics are straightforward, although rolls need plenty of speed in hand
if they are not going to look sloppy. The model has an excellent glide and after a bit of practice you may spot-land it very accurately. Altogether a delightful flying machine.
Structural assessment
This model follows an appropriate structural design for the type, and is in general well designed and strong enough without over-engineering. The only weak point I have found
is the fuselage longerons which will easily crack if the model gets knocked about, such as happens when carrying it in and out of the house, loading and unloading the car etc.
I would recommend replacement with spruce, certainly the lower pair. The only overdone part is the wing trailing edge, being made from substantial pieces of spruce.
These could safely be replaced by balsa, or at least made smaller.
I believe the model should have working rigging wires as the wings are probably not sufficiently cantilever to fly safely without them.
How scale is it?
As a flying model the DB Models Pup cannot be faulted, but as a scale replica it leaves a lot to be desired. Firstly, the fuselage nose is too long, due to an excessively long-chord cowling. This has presumably been
done to minimise the amount of ballast the model may need to carry. It is easy to rectify though; Cut the excess material off the rear of the cowling and mount it immediately ahead of the front centre-section struts without the original front bulkhead.
Then set a 1/4 inch ply former inside the fuselage sufficiently far back to radial-mount
the engine with the prop-driver just forward of the cowling. Add 1/2 inch triangular balsa pieces around the edge of the engine mount former to spread the load.
The model looks much better already and the next modification will reduce the amount of lead you will need at the front anyway.
The tailplane and fin are much too large. Get hold of a decent scale drawing and trace out an accurate
outline over the plan. The construction method employed makes it just as easy to build a correct-size tail as a wrong one. Do not worry that you are compromising stability. The Pup
tailplane is still huge anyway and the fin and rudder are more than adequate. To get the rudder to the correct shape, you will also have to re-draw the bottom longerons so they slope up to
a higher point at the tail.
The final worthwhile modification is to the wing ribs. Block them all together, then thin down the section by reducing the top curve, hollow out underneath between the spars to
give undercamber and deepen the slots for the upper spars so they fit 1/8 inch below the surface. Scraps of balsa may be added on top of the spars to complete the ribs after the spars have been fitted.
There is not much scope for detailing the cockpit, as a plywood former with the rear centre-section struts attached goes right across the middle of it. The more inventive modeller would probably
work out an alternative strut mounting attached to the fuselage sides, allowing the former to be discarded. The only other way to disguise it is to build a well-padded pilot figure which will slot
over the former and fill as much of the cockpit hole as possible.
Colour schemes
They were all brown, weren't they? - well, no actually. Although there were guidelines laid down for the painting of aircraft and the style and positioning of markings, the fact that they were made
by a wide variety of sub-contractors over a number of years meant that many interpretations were put on the official scheme. Add to this the even wider variety of personal markings painted on in the field and you can see there is great scope for
making an individually eyecatching model. If you want something really different, research the pups which had special treatment at training units. Often the instructors' personal machines would receive very
bright and no doubt completely unauthorised repaints. There are many publications on the market these days which cover these in detail. A good source of inspiration is the transfer sets sold for plastic kits. These
usually come with colour scheme documentation.
Final verdict
As a practical flying scale model the pup is enjoyable to build and a delight to fly. I would recommend it to anybody who is seeking an introduction to First World War models. Just don't expect to win major competitions with it.
Postscript:
The Pup kit has been subject to further development by the manufacturers and is now supplied with separate plug-in wing panels replacing the earlier one-piece structures.
|